3-Step Guide To Begin With The Best Artwork Management System
Planning an artwork project is an extensive process, sometimes taking months to finish.
Artwork projects involve multiple collaborators and teams such as marketing, legal, packaging and more. In some brands, global and local teams often collaborate across geographies. Moreover, they use different communication channels. Often due to time differences and their involvement in other projects, it creates a murky workflow.
Consequently, artwork management becomes a mission-critical task.
Artwork Flow is a cloud-based artwork management system to simplify such processes. We have created this Artwork Flow guide to address the varied steps involved in adopting the system into your process.
While developing the Artwork Flow guide, we considered the different scenarios and questions you might have. Hopefully, this post will help solve your queries.
In this Artwork Flow guide, we’ll cover:
- How to set up your Artwork Flow account
- Get started with a streamlined workflow
- How to boost your artwork approval process
- 🔔 Bonus Section: Customize Artwork Flow for your workflow and help your team to level up.
1. Setting Up On Artwork Flow
Artwork Flow is a free online artwork management system. Unlike most systems in the market, it’s simple to set up your account on Artwork Flow. Book your free demo now!
On the demo page, add the following details:
- Name
- Contact Number
- Email ID
- Company Name
You’ll receive a short welcoming message on your email with a link to set up your password. We suggest you secure your account with a strong password.
With your password confirmed, you can now look forward to automated artwork management.
2. Get Started With Workflow
Workflow is an integral part of artwork management. Months of planning need to be organized and streamlined. Every communication from meetings, emails, calls, messages to ad hoc requests needs to be trackable.
However, it gets confusing to know who gave what feedback or know why a graphic was included.
Therefore, working on a single channel will make your teams more productive. Artwork Flow can help keep the transparency in the artwork approval process.
Create A Project In 3 Easy Steps
Step 1: Add Project Details
Once you’ve logged in to Artwork Flow, go to the left-hand side on the top header and click on the ‘Create Project’ button.
The below screen will open up where you can add relevant artwork project details. These include the project name, deadline, brand name, category and packaging type.
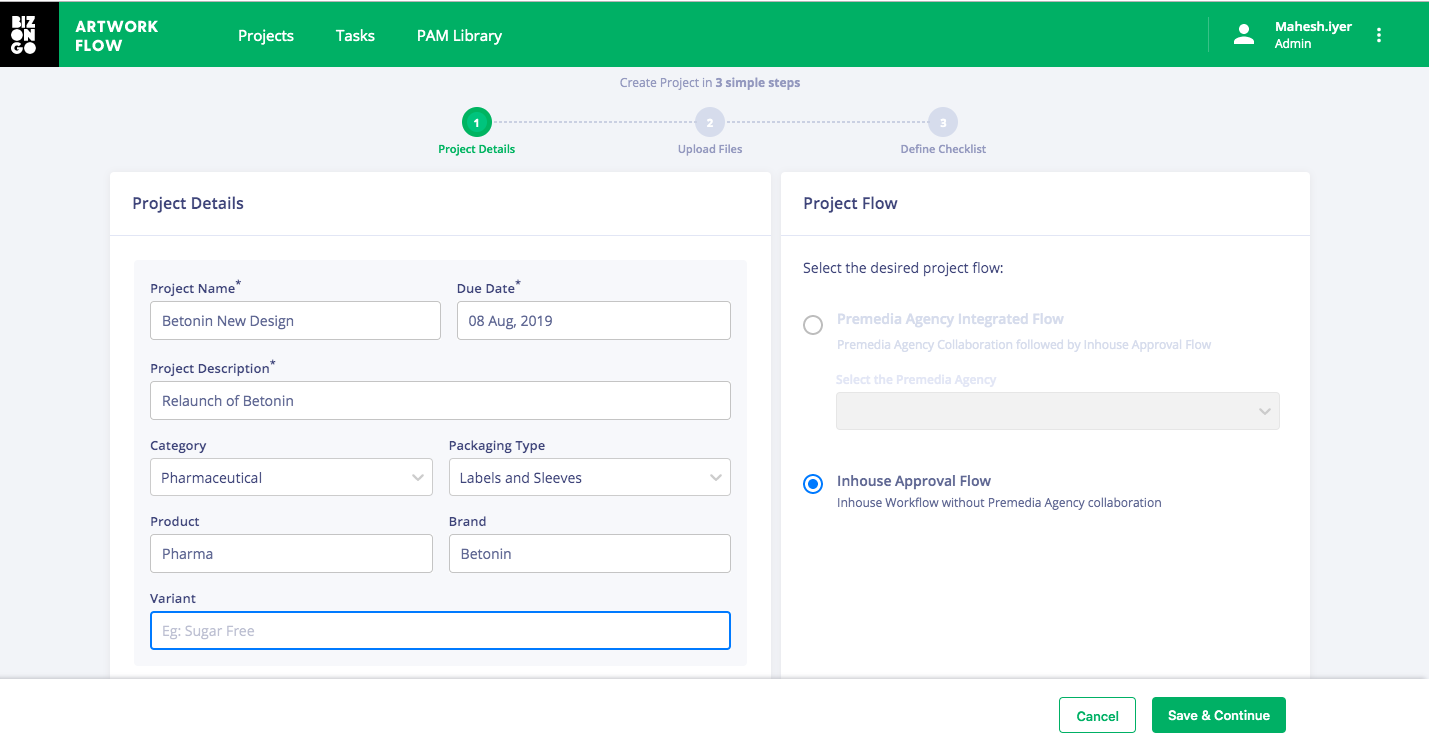
Moreover, you can also choose the flow of the project, whether it's internal or with the external premedia agency. Go over the details to see if the information is correct and save it to get to the next step.
Step 2: Upload Relevant Files
Share knowledge and information with a click. Simply upload the pdf files relevant to the artwork project from your computer or from the Packaging Asset Management Library on Artwork Flow.
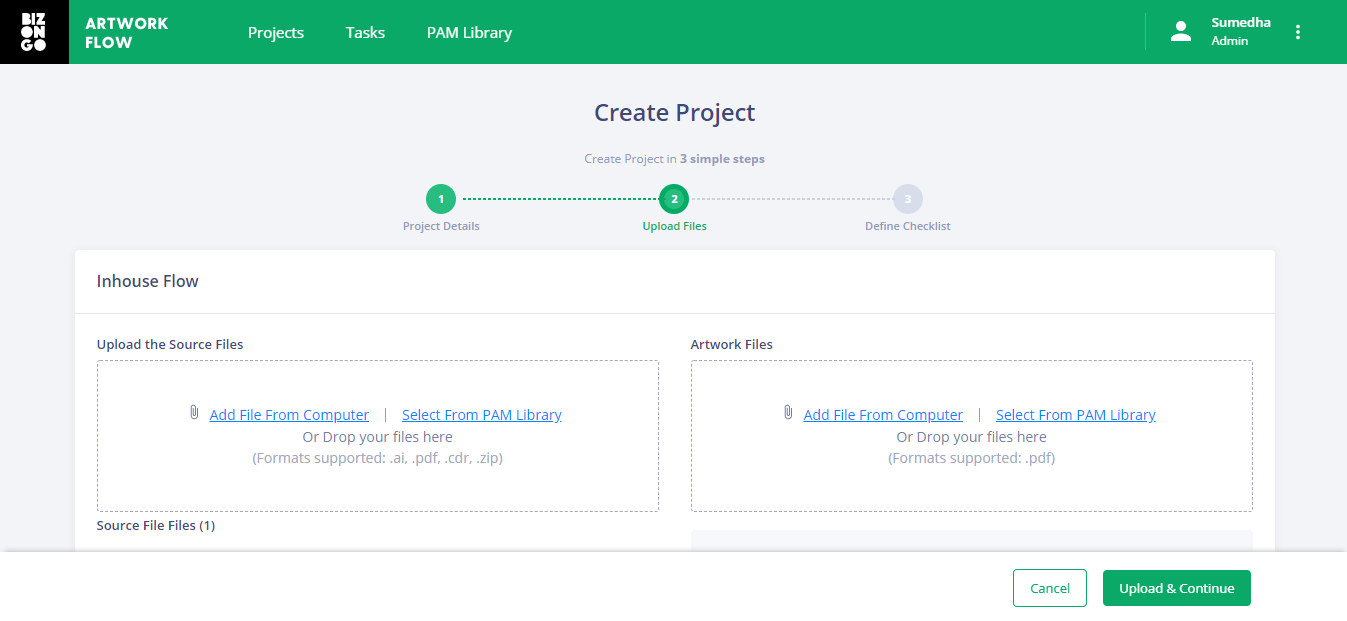
If you are uploading the pdf files from your computer then they are automatically saved to the PAM. These files will be available to you anytime in the future.
📝 Note: Artwork Flow supports artwork files in pdf formats. However, if you have files in AI or CDR file format, then simply export it to PDF format to upload.
Step 3: Customize Project Checklist
This is the last step while creating an artwork project workflow.
Add or select different collaborators that need to be on the project. Next, define checklists for the collaborators. For instance, if it's a food packaging artwork, then you might need to assign the legal team a checklist that consists of verifying information on the design according to FSSAI guidelines.
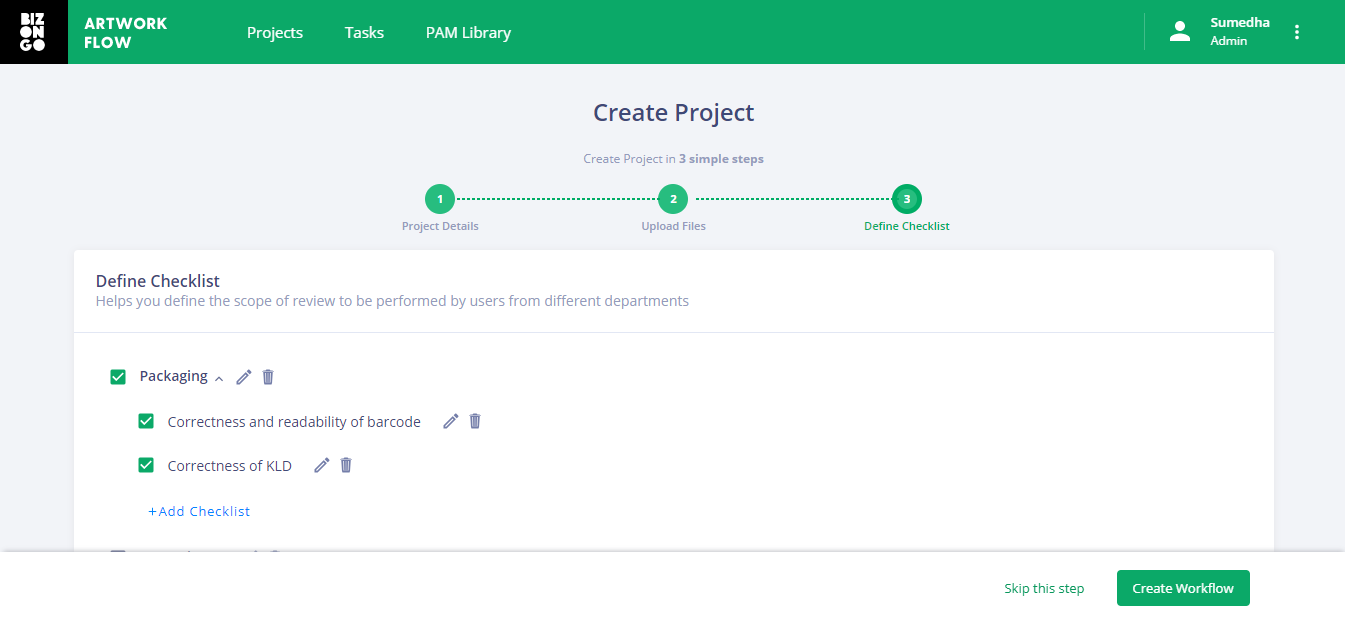
Next, you need to create the different stages of the workflow. Select the appropriate collaborator, assign the checklist and give a deadline to the task.
For example, in stage one, the brand manager will have to validate the colour used on the artwork by a certain date. Once the brand manager approves the artwork according to the checklist the artwork will proceed to the next stage. In the second stage, the legal team will need to verify the artwork according to certain regulations.
Review the stages if they are in order and then click on ‘Create Project’.
Congrats! You just created your first project on Artwork Flow. 🙌
3. Automate Your Feedback & Approval Process
In the artwork approval process, feedback is inescapable and often includes a lot of back-and-forths. Artwork Flow’s features can help to smoothen and speed up the process.
a. Projects 💻
The ‘Projects’ section is on the subheader of Artwork Flow. You can view all projects in this section with details such as project name, due date, brand name and if it’s ‘ongoing’ or ‘rejected’.
When you create a new project, the status of the project will automatically become ‘Ongoing’.
Firstly, you can view who is currently working on the project in the ongoing stage. Secondly, view which collaborator has rejected the file and the reason for it.
Consequently, if a project is approved then its status updates to ‘Completed’.
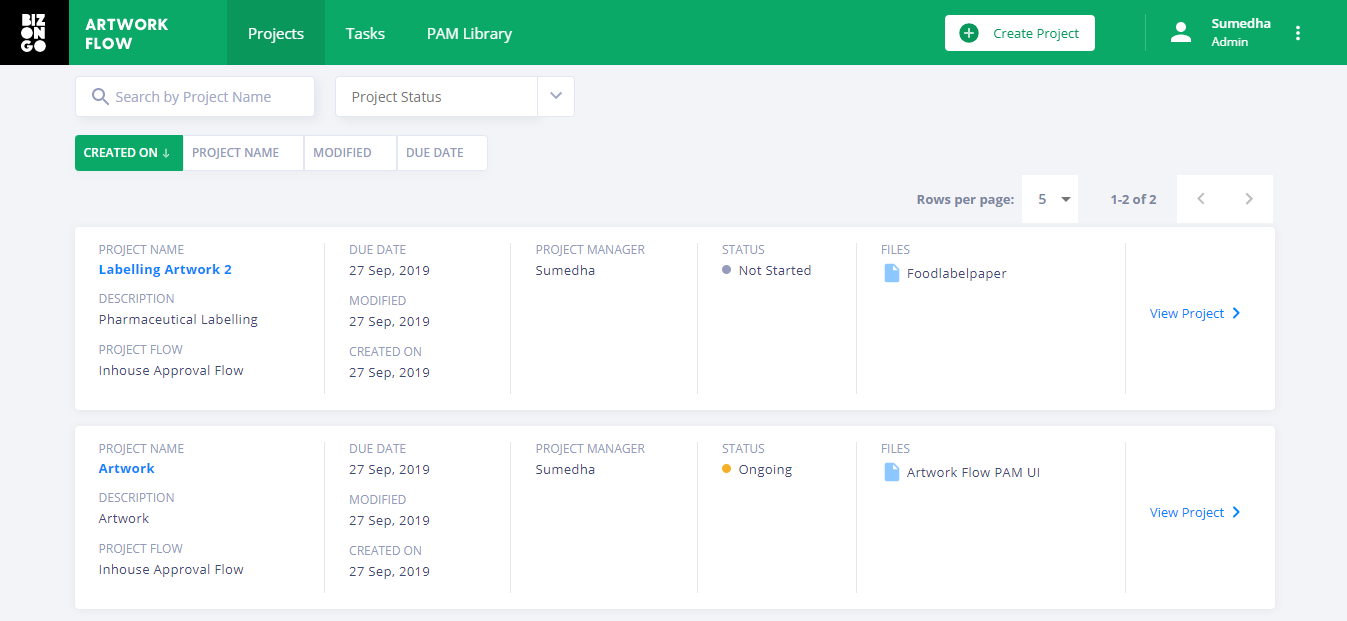
In addition, you can easily find any project by its project name in the search bar.
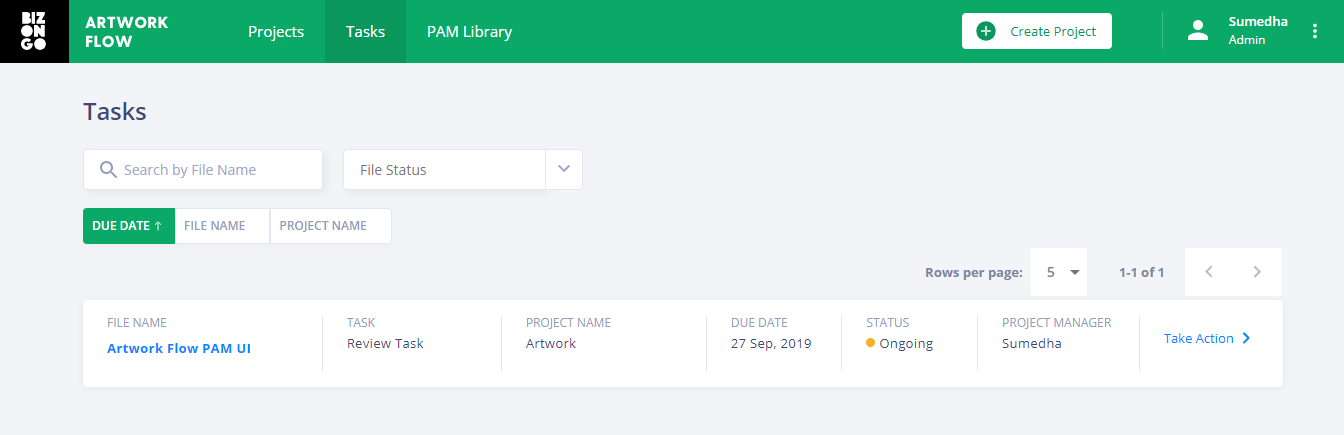
b. Tasks 🚀
If you are a collaborator in a particular project, then click on the ‘Task’ section. The section keeps track of your tasks in a systematic order. Here, you can view and find tasks allocated to you in any ongoing projects. Moreover, you can get started with any task by clicking on the ‘Take Action’ option.
c. Checklist ✅
When you click on any task in a project, you’ll be able to instantly view the artwork.
On the right-hand side, you can see the ‘Checklist’ panel.
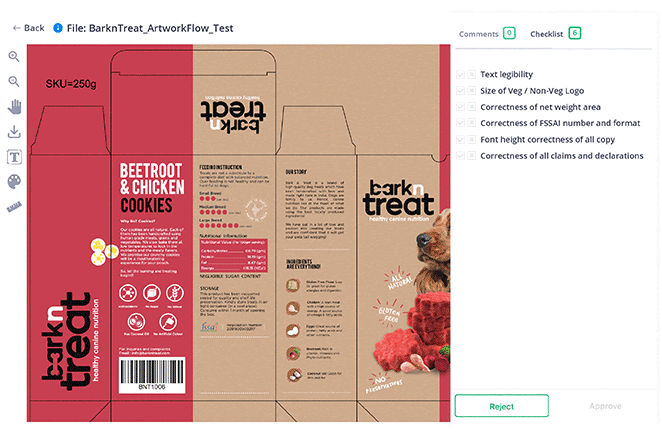
The panel will show details such as to your role in the project and the tasks you need to undertake.
d. Proofing 🔎
Artwork approvals depend on continuous proofing. With in-built online proofing tools, you can compare different versions of the artwork and validate fonts and colours.
You can also run a spell check and measure different graphical elements in the pdf file. In other words, this will help you to be accurate about the artwork.
e. Annotation 💬
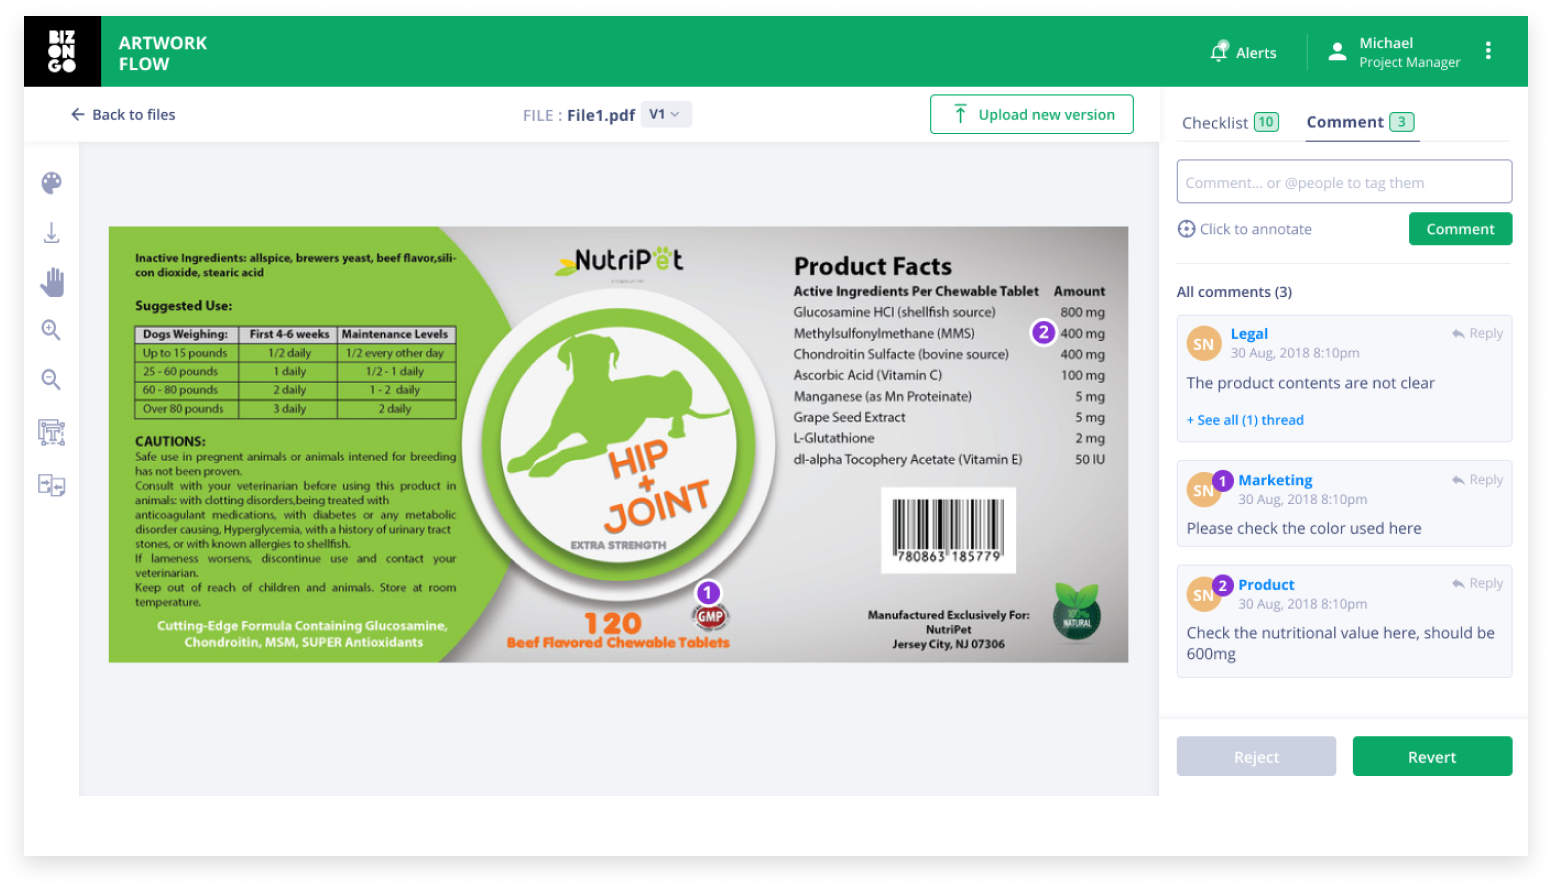
When you have finished proofing, you can simply drop a pin on the artwork and suggest revisions or changes. The comments will be visible to everyone and can be easily found if needed later.
After adding your revisions in the comments, you can ‘Reject’ the file. As a result, the other collaborators can see why the file was rejected.
However, if the artwork adheres all guidelines according to the checklist then you can ‘Approve’ it and the artwork will progress to the next stage.
f. Timeline ⏳

Nailing deadlines is paramount in artwork management. The Timeline dashboard in Artwork Flow gives you a clear view of the progress of the project. Most importantly, you can know whether the artwork is ongoing or rejected, the collaborator currently reviewing the file and who’s next in the approval process.
g. Packaging Asset Management 📂
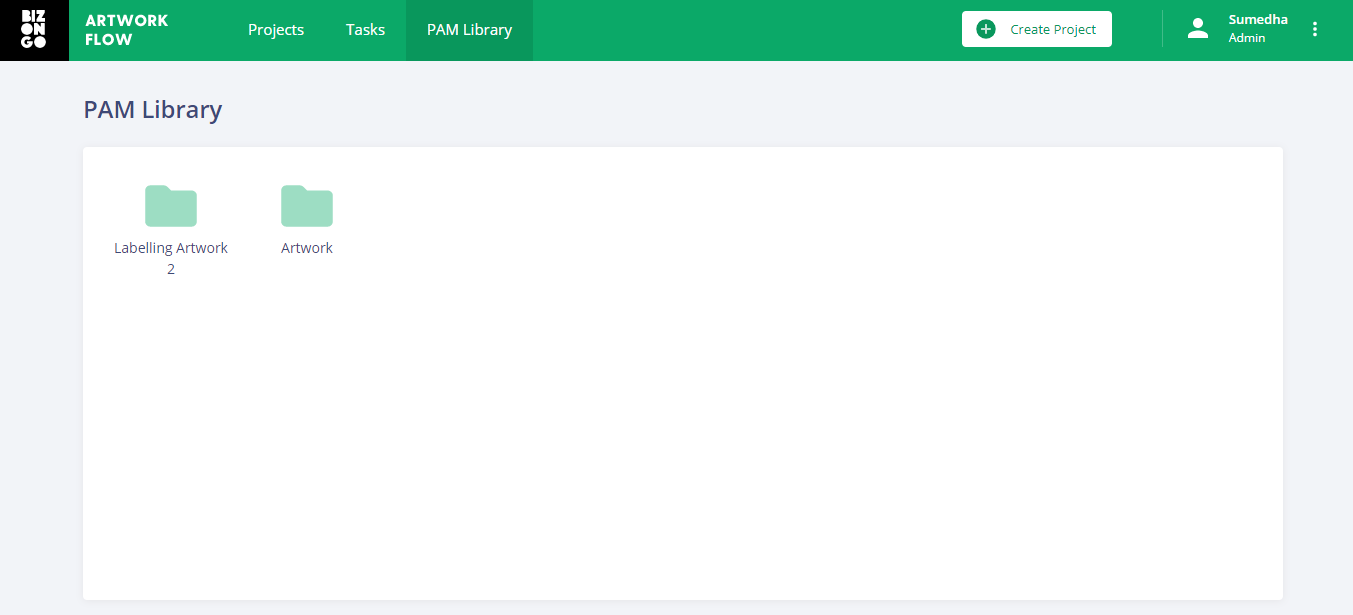
The Packaging Asset Management (PAM) is the cloud library Artwork Flow. It’s the perfect place to store all your packaging artwork assets. You can also authorize access to collaborators assigned to the project and restrict others as well.
Above all, a significant feature of the PAM is version control. When you upload a revised artwork file, it saves the previous versions of the artwork with a date stamp. If you ever need an older version of an artwork, just access the artwork in PAM. Select the relevant date in the dropdown and it’ll show you the artwork needed.
🔒 A note for this section: Artwork Flow uses a powerful cloud computing infrastructure supported by Amazon AWS S3. This ensures that all your information is stored on an extremely reliable and scalable platform. Since Artwork Flow is a Cloud-based SaaS offering, everything is accessible online. We don’t need to have any manual intervention such as an in-house IT Team to overlook any hardware, reducing the chances of data risk.
4. Bonus Tips
For this Artwork Flow guide, we had our team come up with a few tips to give your productivity an extra boost.
a. Invite Your Teams: Collaborating on a single platform will boost your team’s overall productivity. As an admin, you can invite your team to Artwork Flow. Go to the top right-hand corner to your Profile Name. Click on the vertical ellipsis (the 3-dot symbol→ ⋮ ) and click on ‘Manage Access’ in the drop-down menu.
You’ll see a dashboard that shows different users and their roles. Click on the ‘Invite User’ button, add details such as the new user’s name, email id and contact number. You can choose the role of the new user as either Project Manager, Team Member or as an Admin. The new user will receive an email with an invitation link to join Artwork Flow.
b. Onboard Premedia Agency: Most brands work with external agencies for their packaging artwork development. Streamline communication with your internal and external teams with Artwork Flow. You can securely onboard your pre-media agency onto Artwork Flow. Get in touch at artworkflow-support@bizongo.com and our executives will be delighted to help you.
c. Instantly Share Files: We believe knowledge sharing should be simple. All your artwork files are stored in the Packaging Asset Management Library. However, if you want to send the pdf files to a collaborator, then there’s no need to leave the security of Artwork Flow. Just click on the Share icon beside the file, add the email id and send it. The collaborator will receive an email with a link to view the files.
📢 Have we missed anything?
We want to keep this Artwork Flow guide as informative as possible. For this reason, we constantly update it with new features, fresh notes and examples. If you have any questions or need us to add any information to this guide, then drop us a message at artworkflow-support@bizongo.com. 📩
Share this ultimate Artwork Flow guide with your teams and give them a clear understanding of artwork automation.